

How To Set Wordpress To Update Automatically
How To Install Wordpress 4 On CentOS vii
On this page
- 1 Preliminary Note
- 2 Database initialization
- 6 Configure Pretty Permalinks for WordPress
- half dozen.1 Apache Rewrite
- six.ii Create an .htaccess File
- 6.3 Permalink Settings in WordPress
- 7 Links
This document describes how to install and configure Wordpress 4.0 on CentOS seven.0. WordPress started in 2003 with a single bit of code to enhance the typography of everyday writing and with fewer users than you can count on your fingers and toes. Since then it has grown to exist the largest self-hosted blogging tool in the world, used on millions of sites and seen past tens of millions of people every day. This tutorial explains the process of installing Wordpress four.0 on CentOS seven.0 in the form of a unproblematic-to-follow guide.
1 Preliminary Annotation
This tutorial is based on CentOS 7.0 server, so you should set up upwards a basic CentOS 7.0 server installation before y'all continue with this tutorial. The system should have a static IP accost. I utilise 192.168.0.100 every bit my IP address in this tutorial and server1.example.com every bit the hostname. Y'all must have a LAMP server installed in CentOS 7.0 every bit mentioned in the tutorial to continue further.
two Database initialization
I volition create the database for the Wordpress four.0 as follows:
mysql -u root -p
CREATE DATABASE wordpressdb;
CREATE USER [email protected] IDENTIFIED BY 'wordpresspassword';
GRANT ALL PRIVILEGES ON wordpressdb.* TO [email protected];
Farther moving ahead:
Flush PRIVILEGES;
go out
Restart services
service httpd restart
service mariadb restart
Further you need to allow the Firewall-cmd to http and https every bit follows:
firewall-cmd --permanent --zone=public --add-service=http
firewall-cmd --permanent --zone=public --add together-service=https
firewall-cmd --reload
3 Installation of Wordpress 4.0
Nosotros will first make a directory temp in which I will the download the latest version of the Wordpress every bit follows:
mkdir temp
cd temp
yum install wget unzip net-tools
wget http://wordpress.org/latest.aught
Further moving ahead if you wish to work with images, install plugins and site updation with SSH credentials and then we will install:
yum install php-gd
service httpd restart
unzip the Wordpress iv.0 zip file in the binder:
unzip -q latest.nix -d /var/www/html/
Now give appropriate permissions in the directory
chown -R apache:apache /var/world wide web/html/wordpress
chmod -R 755 /var/www/html/wordpress
Further we need to manually create the uploads directory beneath the wp-content directory at our document root. This will be the parent directory of our content:
mkdir -p /var/www/html/wordpress/wp-content/uploads
We demand to permit the web server itself to write to this directory. We can do this by assigning group ownership of this directory to our web server. This will allow the web server to create files and directories under this directory, which volition permit us to upload content to the server. Go on like this:
chown -R :apache /var/www/html/wordpress/wp-content/uploads
Now nosotros need the sample configuration file,to copy information technology to the default configuration file to get WordPress to recognize the file. The sample configuration file is available at /var/world wide web/html/wordpress:
cd /var/www/html/wordpress/
cp wp-config-sample.php wp-config.php
vi wp-config.php
[...]// ** MySQL settings - You can get this info from your web host ** // /** The name of the database for WordPress */ define('DB_NAME', 'wordpressdb'); /** MySQL database username */ define('DB_USER', 'wordpressuser'); /** MySQL database password */ ascertain('DB_PASSWORD', 'wordpresspassword');
[...]
Alter values as you gave at the fourth dimension of database initialization.
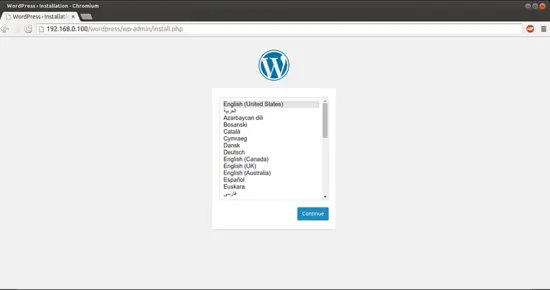
Now proceed to the web installation of Wordpress 4.0. Go to the URL http://192.168.0.100/wordpress/wp-admin/install.php:
Select linguistic communication and press Continue:
Next
 Advertisement
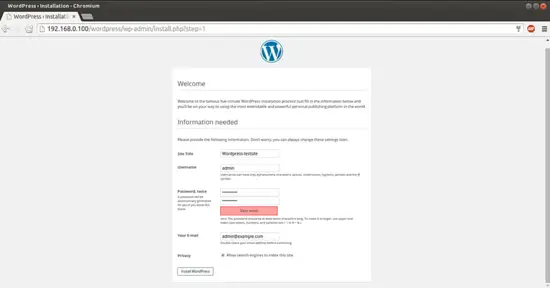
Now give the values as I gave in my instance
Site Title = Wordpress-testsite Admin E-mail = [electronic mail protected] Username = admin Admin password = howtoforge Confirm Admin Password = howtoforge
The above values volition differ in you instance, you can give any values of your choice. Afterward giving the values printing InstallWordpress:
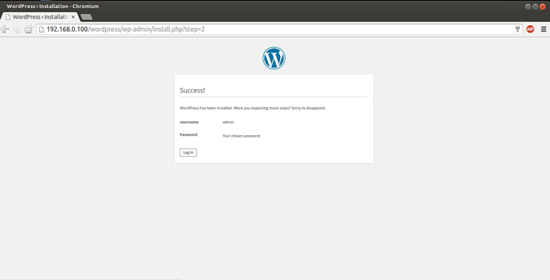
Now nosotros volition keep towards the login page past pressing LogIn:
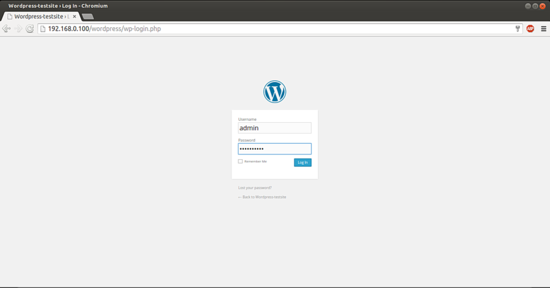
Give the credentials as you selected at the time of spider web wordpress installation:
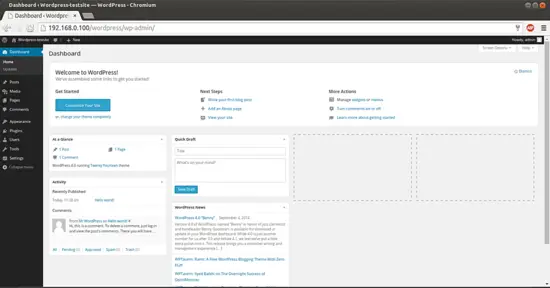
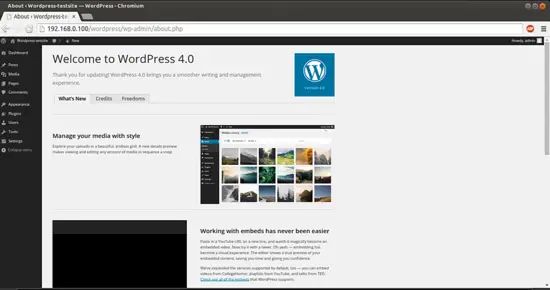
This will be your default welcome window of Wordpress. We tin check the Wordpress version in browser as:
half dozen Configure Pretty Permalinks for WordPress
This office is optional.
By default, WordPress creates URLs dynamically that look something like this http://server_domain_name_or_IP/?p=1. This isn't exactly the about useful interface for visitors or search engines, so almost users desire to modify this. WordPress has the ability to create "pretty" permalinks which volition clean up the URL into a more human-friendly format. To overcome this affair nosotros will proceed as follows:
half-dozen.1 Apache Rewrite
We volition modify the apache virtual host file for Wordpress to go information technology allowed for .htaccess overrides. For this we will edit the virtual host file and add the entries as: Advertisement
6 /etc/httpd/conf/httpd.conf
[...]
                # Further relax admission to the default document root: <Directory "/var/world wide web/html">     #     # Possible values for the Options directive are "None", "All",     # or any combination of:     #   Indexes Includes FollowSymLinks SymLinksifOwnerMatch ExecCGI MultiViews     #     # Annotation that "MultiViews" must be named *explicitly* --- "Options All"     # doesn't requite information technology to you.     #     # The Options directive is both complicated and important.  Delight encounter     # http://httpd.apache.org/docs/ii.4/modern/core.html#options     # for more information.     #     Options Indexes FollowSymLinks      #     # AllowOverride controls what directives may be placed in .htaccess files.     # It can be "All", "None", or any combination of the keywords:     #   Options FileInfo AuthConfig Limit     #                AllowOverride All
                [...]
Change the value from AllowOverride None to AllowOverride All, side by side restart the service:
service httpd restart
vi.2 Create an .htaccess File
At present nosotros will create .htaccess file in certificate root, it will allow Apache to rewrites:
touch /var/world wide web/html/wordpress/.htaccess
We need the web server to be the group possessor though, so nosotros should adjust the ownership as follows:
chown apache /var/world wide web/html/wordpress/.htaccess
If you desire WordPress to automatically update this file with rewrite rules, y'all can ensure that it has the correct permissions to do so by using:
chmod 664 /var/www/html/wordpress/.htaccess
If you want to update this file manually for the sake of a small security gain, yous tin can permit the web server only read privileges by typing:
chmod 644 /var/www/html/wordpress/.htaccess
In my example I am using permissions 644.
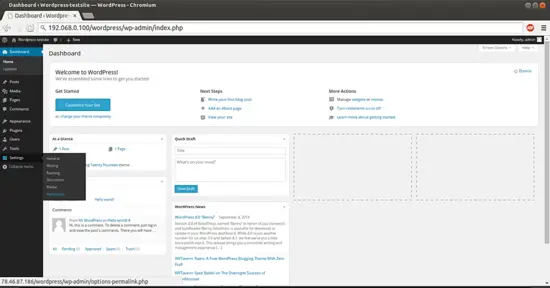
half dozen.3 Permalink Settings in WordPress
Now we can hands adjust the permalink settings through the WordPress administration interface. Goto Settings-->Permalinks:
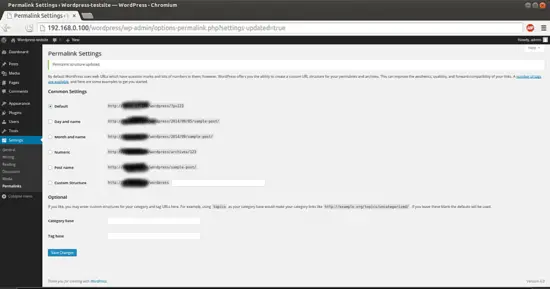
When you lot have made your selection, click "Salve Changes" to generate the rewrite rules.
Case1: If you allowed the web server write access to your .htaccess file, you should see a message like this:
Case2: If you did not allow the web server write access to your .htaccess file, you will be provided with the rewrite rules y'all demand to add to the file manually.
In that case yous need to add the values in the .htaccess file manually, Wordpress volition pop-up the Rewrite value in the same screen every bit shown below:

Copy all the lines that WordPress gives yous and so edit file on your server:
vi /var/www/html/wordpress/.htaccess
Just add together the lines generated in the file and it will provide the same functionality.
Congratulations! You at present have a fully functional WordPress four.0 instance on your CentOS 7.0 :)
vii Links
- Wordpress : http://wordpress.org/
- CentOS : http://www.centos.org/
Suggested manufactures
This feature is just available to subscribers. Get your subscription here.

Source: https://www.howtoforge.com/how-to-install-wordpress-on-centos-7
Posted by: henryresocand61.blogspot.com
0 Response to "How To Set Wordpress To Update Automatically"
Post a Comment